Thursday, February 10, 2011

Topiaries

Hello friends,
Sorry I've not posted in a bit but my little guy had his tonsils out on Tuesday and I wanted to give him my undivided attention. I've also had topiaries on my mind because I've been wanting to make one for a Valentine's Day gift. I'll show you how I did it at the end of this post. Anyone who knows me, knows I am a bit competitive but that has nothing to do with my love of topiaries. I get that topiaries originated as a display of mans dominance over nature, but for me,  I really just like the way they look! Inside and outside, flanking an entrance or mantle or on the kitchen counter...they look so elegant and they are so easy to do. A topiary will take a bit of patience and a little more attention than other houseplants but they are worth it don't you think?

http://www.srgambrel.com/portfolio/town/tenth-street/

Dutch magazine, VT Wonen 

Dutch magazine, VT Wonen

These are actually preserved boxwood and not live plants. http://www.restorationhardware.com/catalog/product/product.jsp?productId=prod1678008
From interior designer, Shannon Bowers- her restored two-story Georgian home.
 www.veranda.com

Also from interior designer, Shannon Bowers' restored two-story Georgian home.
 www.veranda.com

Source Unknown

Vivamore

Here is a simple tutorial for making a heart shaped topiary. {On a side note, I want to do more instructional type posts. If you have something in mind that you would like to see, just ask!}


To make this heart shaped, ivy topiary you will need:

Ivy plant (during the winter months they are available at Walmart, Home Depot or the grocery store)
Wire coat hanger
Decorative pot or container
Potting soil

Because I have many topiaries, I am often pruning them and rooting the slips that I trim off. This will be the case for you as well. At first, you want to let the ivy grow and continue twining it around the form so that you will have a nicely shaped and full topiary but after a while just snip off the wayward shoots and put them in water. In a  couple of weeks they will start to get roots and will be ready for another topiary...maybe an egg shape for Easter. It's a slippery slope -you will have a collection in no time and some for giving!
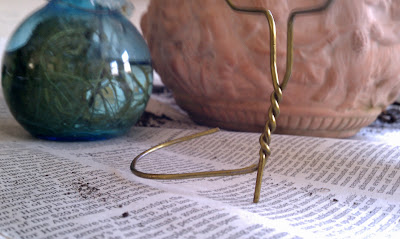

Bend this part of the coat hanger as shown. It will help hold the form in place.


Shape the hanger into a circle first to get the "bends" out and then shape it into a heart (or four leaf clover or any other shape your heart desires).


Plant your form and ivy together in the container. Twine the ivy around the form. It's that simple. If you would like, tie a ribbon around it or hang an ornament from the center and if you really are into it, use two forms to make a three dimensional heart. (Would you like to see what that looks like?) In the background, is a circle topiary that I made last year and as you can see it is quite full. It doesn't take long!

Have fun and if you try it, let me know how it turns out!
Michelle


Sunday, February 6, 2011

Real Man Caves


I hope you forgive me for this. I thought it might be fun to tie in the big game this weekend with my Fun Friday post . In my quest to find something football related and fun and design-y I thought of man caves. I have to tell you, I've never seen so many rooms that I hate. Why is it that man cave is practically synonymous with tacky. I'm sure there are some very cool masculine rooms out there that happen to have a large TV, recliners, a pool table and/or a poker table, a dart board and sports memorabilia...maybe they are just considered masculine family rooms or dens and not the proverbial "man cave". I found a lot of this:


I did find a clever way to utilize a stairwell - kind of like a man-tunnel.
 Finally, after exhausting my usual means, I found these  man-caves (that are actually in homes that are for sale) in a recently published article on Zillow.

Understated... don't you think?
Cambridge, MD
An "antler themed" man cave.
Camdentown, MO
Larry the Cable Guy's very own man cave.
Sanford, FL
What you don't see in the picture are the two theater rooms, the arcade/dance club, and the bowling alley.
Washington, UT

Notice the glass encased wine cellar in the corner. Nice touch!
Laguna Beach, CA

My favorite! Of course it's part of a plus ten million dollar estate! A boat house converted into a tavern-like man cave.
Nautilus Island, Brooksville, ME


With or without a man cave, enjoy the game! My Colts aren't in it so to steal a line from my daughter- Go Commercials!
Michelle

Wednesday, February 2, 2011

Rooms to Hibernate In

traditional bedroom by The Old Painted Cottage
via The Old Painted Cottage

Happy Groundhog Day! Did you know that "the Groundhog Day celebration is rooted in a German superstition that says if a hibernating animal casts a shadow on Feb. 2, the Christian holiday of Candlemas, winter will last another six weeks. If no shadow was seen, legend said spring would come early".  As I read that this morning, on Yahoo, the word that stuck in my head is "hibernating". It's soo cold outside, the kids have a snow day today and hubby is working from home this morning -so, we are kind of hibernating. While I'm trying to work up some motivation to not hibernate and get out and run, my mind keeps going back to a bed I saw recently with luxurious bedding, voluptuous pillows, and a fireplace nearby.... ahhhh, I want that! I'm not one to lounge but this morning (while I am running) I will be thinking about lounging in one of these rooms:


mbr-bookshelves-elle-decor
Unfortunately, I cannot find the picture I was telling you about (I could have just imagined it) but this room has it all- reading chair by the fireplace, tons of books, and a cozy looking bed. That works for me!
Is there anything more inviting than a built-in bed?
How about this one?
(via www.weheartit.com)
An upholstered headboard and warm, neutral tones and textures are a recipe for relaxation.

Very neoclassic, so of course this is my favorite!
(www.tracymurdock.com)

...another view

Just makes me sigh, ahhh
www.twolia.com

Silvery gray with mahogany has always been a favorite and that floor lamp...just gorgeous!
(Glenn Gissler Design) 

A sweet ending to my round up of rooms conducive to hibernation.
(Gibbons, Fortman & Associates)

I hope you enjoyed your visit today and btw, did you know that, including today, that the groundhog has only not seen his shadow sixteen times since 1887. Spring is right around the corner!

Michelle

Monday, January 31, 2011

Interior Windows

Watercolor; by Walter Mosley
(available for purchase)
Today I'd like to tell you a little about my design philosophy. When I'm asked to redesign a room the first thing I visualize is what the room looks like without anything in it. Notice that I said redesign and not redecorate. I think that, because I originally started in the field of architecture, I prefer that first, the room can stand on its own architecturally. Perhaps more simply stated, is the room interesting with nothing in it. As I continue to blog I will describe a variety of ways to do that, some are simple and some more elaborate. Usually the only thing that separates the two, is time and money (isn't that always the catch!). Obviously, preference also plays a major part. One way I like to add architectural interest to a room, is by the use of interior windows. Admittedly, this is an example that is not always applicable but it just so happens I saw this image today (below) and it inspired me to bring up the subject. 

You can consider adding a transom window if you have a doorway or opening between rooms that is at least eight feet high. 

Transom windows can be fixed or operable. 


I came across this lovely post by Vintage Simple also about interior windows. Aren't these rooms so much more interesting because of a simple architectural feature: a window!


Here, the small partition wall and window allow the space to feel open but  perform the practical task of  concealing shoes and coats and creating a draft block when the door is opened.


Here again there was a need to create a physical separation between the entryway and the adjoining room.
In our home, we also decided to separate the mudroom (aka the decompression room) from the kitchen. We used a French door with a transom window. On days like today, when the temps are in the single digits, it really helps to keep the cold air out! 


A wall with windows, much more interesting than a wall. It also serves the purpose of letting the light flow in from the kitchen. Notice the tray on the table- I love it. Trays will be the topic of an upcoming blog. It is one of my must haves in practically every room. More on that soon! Back to the topic- Considering the architectural features in a room will always be my first step in redesigning a room and from there it's a little bit different every time.

Hope you enjoyed the visit. Let me know what you think!
Michelle

Friday, January 28, 2011

Fun Friday Find: Painted Stairs


Greek Steps by Elizabeth Osborne
I don't know if this is everyone's (or anyones) idea of fun but I have been toying with the idea of painting the stairs going down to the basement. I thought it would be the perfect location to try something a little fun. The stairs are a contractors special (2x12's) but they do have closed risers and I'm pretty sure a couple cans of paint would be cheaper than replacing them. Here are a couple of the "FUN" ideas that I found:


All three of these designs (one above, two below) were either painted or stained using Royal Design Studio stencils. 


Melanie Royals, the founder and creative force behind Royal Design Studio is a leading innovator in bringing the art of painting architectural finishes and surface designs to the level of popularity that they are currently at. Btw, what do you think of the door (above)?


 Follow this link to check out more of her designs: http://designamour.com 


The sunny design above was painted by Carol, at Painter Girl Blog. She used four different stencils from Royal Design Studio.

http://www.desiretoinspire.net/
This is actually what I was thinking of doing. Boring or simply understated? I vote understated. If I knew for sure that I wasn't going to be replacing the stairs at some point with an upgraded version I would probably opt for a more intricate pattern but I think this just looks clean and fresh....and simple!
www.simonbrownphotography.com , taken from Thrifty Chic (Cico Books)
Maybe I could incorporate a stripe or two. I'll have to keep an eye out for a sale on painters tape!
How about wallpapering the risers? Hmmm...I'm liking that. 

These are incredible. 

Now that is some serious fun! I'm joking, that is truly a work of art though. (and an exercise in patience!)

Boy, the projects are piling up. Does anyone else feel inspired to paint the stairs? 
Have a great weekend!
Michelle

Thursday, January 27, 2011

Terrariums

I wasn't planning on getting a new post up today but I just sat down to look at my blog and I had a comment with a question. I just love comments (and questions)! 
The question pertained to terrariums and might I have any ideas for containers. I do have a little experience with them, in fact, it was the summer project here at the Samoraj's and no little project mind you. Actually, like usual, it started little and then, well, you know... a forty gallon tank, a filter system, assorted plants from the yard, several earthworms and two turtles later we not only have a terrarium, we have a paludarium (half terraium, half aquarium)! I would just go take a picture of it but the turtles have eaten all of the plants and it's just not that attractive at the moment -trust me it won't inspire anything good! The images below, on the other hand, just might. 

I thought this was pretty cool. The small opening might pose a challenge getting plants in but I'm sure with a little patience it would be worth it.

Any clear glass container will work. I think the mason jars would look great lined up on a kitchen window sill. You could start some basil, parsley or marigold seeds. 

Get creative with the "gravel"  use marbles, sea shells, or colored gravel that coordinates with the room decor.

Like little rolling hills, I love the simplicity. 

Thank you Vanilla & Thyme for inspiring me to squeeze this post in tonight. Also, I think I will give that paludarium a good cleaning tomorrow so I can get a picture of it. It truly was a worthwhile experience for the kids. I followed instructions from an old Martha Stewart for Kids magazine. Here is the link:

Michelle

Updated: Jan. 31, 2011
PS. For all those waiting to see the paludarium here it is!