Tuesday, February 21, 2012

Countertop Decisions

Kitchen Update: Part Four

Okay, I need to take a quick break and tell you what I've been up to here in the kitchen. 


Cramming- that's what! I went ahead and scheduled a date for the granite countertops to be templated because I felt that it would keep us moving- you know, on track. Well, the template was supposed to be made last Friday and sure enough I had to reschedule to yesterday. I am truly struggling with my own kitchen decisions. Choosing a countertop was a biggie!


Here are the three that I narrowed it down to.


Black (with a little gray),


 Ivory (with black and a little red), or


 Black (with bluish/greenish and some brown)


I decided on a black granite (the one right above). I really wanted a honed slate or a honed absolute black granite but shockingly those are not in my budget. Sooo, I like this last one- it's called peacock and actually doesn't look anything like the picture- the red that you see is actually the reflection of my phone.


They gave me a larger chunk when I went to visit our slab. It looked much prettier when I saw the entire slab and now I'm in love. I know it's destiny because it's called peacock and guess what- my favorite pattern of Polish pottery dishes that I use are also called "Peacock". It was meant to be :)


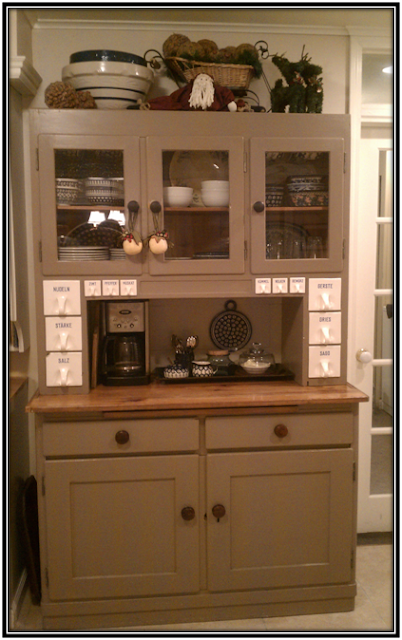
The contractor (my husbands brother) built the open shelves on either side of the vintage sink. They still need their face frames which I think we will end up doing ourselves and then on a whim I decided to replace the base cabinets. That's what really held us up because they will not measure for the countertop until all cabinets are installed. Saturday night and into Sunday morning & one large bottle of wine later, we got it done. I purchased "in-stock" oak cabinets which I'll paint and glaze and trick out with some trim to give them a more custom look. (A future post!)


Yesterday they came and made the template. I had never seen them do it this way before. They stuck sensors all over the surfaces of the walls and cabinet tops. 


They used another instrument that I unfortunately didn't get a picture of but it recorded all of the data from these sensors and will directly transfer the information to the computer that is used at the cutting machine.
Pretty cool- not a lot of room for human error.
I've been painting cabinets all day. The granite is scheduled to be installed next Monday and I want to at least have the cabinets finished before then. 
I was going to say I hope your weekend was better than mine but in retrospect, our weekend was kind of fun- the hubster and I work pretty well together!

Tuesday, February 14, 2012

Monday, February 13, 2012

Tassel Love


Hi there lovely readers! I made one of those little tassels that I showed you a while back from Living in a Nutshell blog. It's a super simple project made from a champagne cork, decorative paper and ribbon. I was clammering to get this post up over the weekend in case someone was looking for a quick Valentine's day project but instead, my family and I took a spontaneous trip to Buffalo. My daughter's birthday was last Thursday and it was the first time that I didn't see one of my kids on their birthday. 
I didn't like that! Not one bit :(
So we all met in Buffalo and had dinner. 
Mama was much happier after that :)
Don't fret though- you still have time- it is that simple, especially if you already have a champagne cork.

Aren't these adorable?

Here is the one from livinginanutshell.com
I like it better than mine because of the ribbon color but my red velvet ribbon makes mine look a bit more Valentines-y. Right?


First you need to drill a hole through the cork top so that you can thread a ribbon through for hanging. I used my Dremel but any drill would work. Warning: That part was messy!
Then you need some decorative paper


In the original post they used pages from a french book. 
I liked the look of text and I have this Italian poem rubber stamp.


I just stamped all over a large sheet of newsprint paper. Ohh, I just got an idea as I am writing this post. My husband is an investment broker I think it would be really cool to use the stock quotes page from the Wall Street Journal. I have the cork from the bottle of champagne that we drank at our wedding. Won't that be special! He can hang it on the drawer of his bedside table and always think fondly of me- tee hee. I do think he would like it though, I mean, as much as a guy would like that sort of thing. I'll let you know :) 
Anyhoo... back to the project.


Cut the paper in strips  about 14"  long. 
I did three different widths so that the tassel looks more full.


Cut the strips into fringe, leaving about a half inch at the top.


Glue the paper around the cork. Cover the edge with ribbon. A hot glue gun is the way to go. 
Wasn't that simple. 
One more thing- I think I'll put one of these in my kids lunch tomorrow.

apple cuteness for kids' lunch on Valentine's Day!

How cute is that! <3

PS Check out my St. Valentine's Day Pinterest board for more inspiration!

Friday, February 10, 2012

If Only Black and White Were Black and White

.
via
Kitchen Update: Part Three
Over the course of the last two posts and now this one, I've tried to give you a glimpse into how I'm coming up with our kitchen design. I will admit that it's been much harder coming up with a design for my own kitchen than it is for me to design someone else's. I can sound so confident telling a client my ideas but with me as the client- I vacillate between this or that, these or those, I lose sleep and I hate having to consider a budget! 

Maybe I should have started off my kitchen updates with my favorite kitchen inspiration photos, that way you would have known the direction I'm going in, especially since I asked your opinion on pendant lights in my last post. I did mention that my design would be classic and timeless, most likely black and white- I know, I know it's not uncommon but I love it and have always loved it. I see it as the perfect backdrop for my ever changing whims. It's kind of like I'm hard-scaping the kitchen in black and white (ie. cabinets, countertop, etc) and then the soft-scaping (window treatments, table linens and china) will shape the feel of the room as the seasons change, as my mind changes and when the holidays roll around.

The struggle I had was white with black or black with white or white on white you get the picture. Check out some of my favorite combinations below:


Transition between kitchen and dining rooms.


rustic kitchen

lighting + hardware + black moroccan tile floor

Classic White Kitchen | photo Michael Graydon | design Halina Catherine | @House and Home

love it!


kitchen


Nice combination


kitchen styling

All white kitchen....and WINDOWS!

Christopher Peacock kitchen

#kitchen

They all start looking alike, don't they? 
I've deciphered each one, looking at every little detail and these are my sources of inspiration.
I have even more on Pinterest.
Now, the fun part...applying all of this inspiration to my own space. 
Getting sick of hearing about the kitchen?!
Over the weekend I'll share a couple of Valentine's projects with you :) 
Have a great weekend!

Wednesday, February 8, 2012

The Evolution of a Kitchen: Part Two


allen + roth 6-7/8"W Mission Bronze Aztec Pendant Light with Clear Shade
Allen + Roth Lighting


What do you think of that pendant light? It's one of several that I'm considering for over the counter.


I always regretted not putting pendant lights over this counter as part of the last reno. So when the ceiling came down and to be honest- all most immediately, even when we were in the holy crap look how much water has accumulated up here stage, I was thinking - hmmm, new lighting plan! Always a designer! Just to be sure that I wanted pendant lights, we lived with soda bottles hanging from the ceiling for a few days.


I thought it was important to look at them from every angle.

for the kitchen
Allen + Roth

 In the pendant lights that I can actually afford category, I think the one above is my favorite.
The outside glass looks tinted in the picture but it's not- it's crystal clear.


In the adjacent eating area, I have one of those ever popular brass chandeliers that came with the house. I painted it black a few years ago and added shades. I don't want to have to replace it immediately but I won't let it be a determining factor in what I choose for the pendants.

allen + roth 6-1/2"W Bronze Mini Pendant Light with Frosted Shade
Allen + Roth
I love the shape of this light but I'm not crazy about the color of the shade with where I'm going with the design- which is black and white, shocking I know. I can't help it! I'm a black and white kind of girl :)


When I look at the picture above I see a new stainless wall oven in my future.

kitchen?
Seagull Lighting

This is contender number two.  Tough decision! What do you think?


What I see when I look at this photo is a stainless refrigerator to match my new stainless oven. Now picture the lights, hmmm the glass cylinders or the white with brushed nickle, maybe the Edison light-help! Because I think of pendants like jewelery, I'm going to wait until the countertops get in and then decide but I would love to hear your thoughts.

In Part One you may have noticed that we built a space for a couple of niches between the kitchen and dining room. You can see one of them in the above photo. Tomorrow I'll show you my ideas for that space. 
But for now- Which pendant would you choose?
1. the Edison light
2. the glass cylinder
3. the square shade
4. the white shade and brushed nickle
or
5. stick with the Pepsi bottles :)

Monday, February 6, 2012

The Evolution of a Kitchen: Part One

Did you have a good weekend? I hope so. After a week of being quite under the weather (the reason for the absence of posts last week), I had a pretty productive weekend. If you've been following along you know that a few weeks ago, Friday the thirteenth to be exact, we had a water pipe burst in our kitchen ceiling. By the end of that day, we had a good portion of the ceiling down, the wall cabinets off the walls, some wall board and insulation that was soaked was removed and by the end of that weekend we ended up having to pull the base cabinets out. 

This week I will be posting exclusively about our kitchen reno. In order for you to get the full flavor of it, I need to give you a little background. 

Usually, a kitchen reno is planned over the course of months ...or at least weeks.This was just dumped on us {literally} and like all things that happen that way- it was quite stressful. To back up a little- we did start the kitchen reno a few years back, we completed a good portion of the kitchen back then and we did the work ourselves but there were things, like the cabinets and countertops, that we put back "temporarily"- well, I guess it's time to finish up those things that were never completed. 

Here is the original floor plan:

Of all the things I do, space planning is my favorite! I love listening to the requirements that a client has (or would like) and then designing the new space to meet their needs. My husband- not so much! He says most wives change the curtains or paint colors- I always want to move walls!
Let me explain why the walls needed to be moved!


A: We were given a vintage porcelain sink with drainboards on either side but not any old sink- it was the sink from the family camp- the sink where I can still picture my husbands grandmother preparing meals and washing dishes. As silly as it may seem, we love that old sink and really wanted to use it in the kitchen. It was wider than the sink we had so we had to move the dishwasher to the next wall.

B: The desk had to go! It wasn't big enough for homework or paying bills. I was constantly pushing the chair in and basically, it became a catch all for mail, keys and junk! Hated it but the big motivator was that I had purchased an old German baking cupboard (below)!  I needed more space. 


Last, but definitely not least!
C: This is the entry from the mudroom which in real life is the main entry. I didn't like that the line of traffic (a term that refers to where people actually walk) was right into the end of the island. I especially didn't like that it was the focal point from the mudroom aka the main entry. After all, a cook top is not attractive- especially when you are cooking. 

In order to have the kitchen configured this way I had to alter the footprint in the mudroom as well. Here is the original kitchen plan (same as above) but with the adjacent mudroom.

Before

After

I won't get into the mudroom design other than to say that it is a much better space plan. The large, very sunny windows are no longer in the closet (wasn't that crazy) and the space is more of a room rather than a hall. The washer and dryer are exposed but it is worth the trade off and besides I have plans for them- down the road.

Back to the kitchen- here is a close up of the new kitchen layout.

Now, when you enter, there is a clear traffic flow area with a line of sight which is actually beyond the kitchen to the fireplace in the family room and from the family room, because of the new raised counter (where the stools are) you can't see the kitchen counter tops, cook top, or sometimes mess, which was another priority that I had. Also, there is room for the sink and the German cupboard. I don't have the desk that I didn't want anyway and I lost one 36" base cabinet but it was a trade off that was very worth it. I also designed two little niches into the doorway between the kitchen and the piano room. 

That's it for part one- 
I hope this wasn't too mundane, not a lot of pretty inspiration but that will come with the next post. I really wanted to explain the project from the beginning and give you some insight into the process. 
I am very excited about sharing all the pretties so stay tuned!